Korcett KMC
Service Cloud Ticketing
Zendesk
We no longer ticket anything in Zendesk. Use Zendesk only if you need to look up information from an existing Zendesk ticket. New tickets should be submitted via Service Cloud.
Go to http://korcett.zendesk.com
Login
You will be prompted to login at this screen: 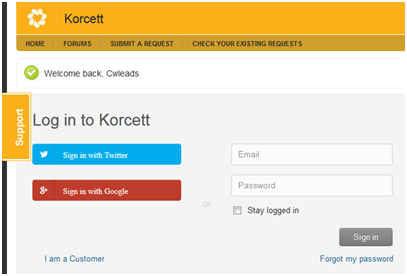
Login with the following credentials:
Username: cwleads@cwxtx.com
Password: firewall1
Create a Ticket
Now you can create a new ticket for your caller or search for an older ticket to look for status updates.
1. To create a new ticket click the “+add” button at the top-left.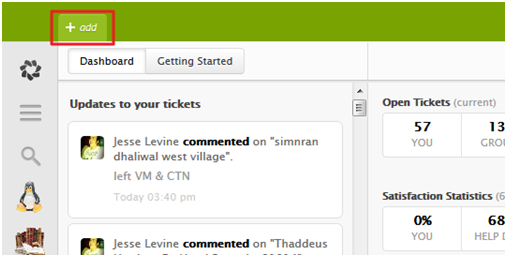
Now on the next screen there are quite a few drop downs you need to fill out as well as pasting your ticket template. For the sake of documentation we will cover both separately.
2. Subject and Details
Make sure your Subject is “CW – Caller Name – Location” and place the filled out note template in the Description field.
Details – Should include your completed note template from CAT or use the new Macro in Zendesk and complete each field. Note: Always verify from KMC that the account number is correct. When applicable, explain why you can’t retrieve the IP or MAC Address:
ContactWorks Agent:
Account:… ALWAYS VERIFY…
Contact number:
Bldg/ Apt:
Caller’s Connection (wired/wireless):
IP Address or reason why no IP Address: MANDATORY OR LIST WHY NO IP
MAC Address(es): MANDATORY OR LIST WHY NO MAC
Dates/Times of re-occurences:
Issue:
Troubleshooting Steps:
Verification/Conclusion:
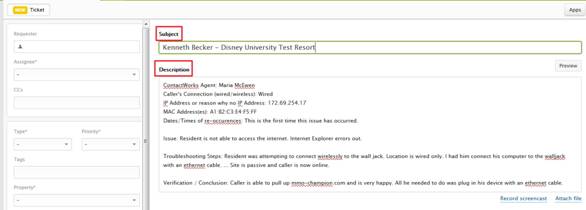
The Attach file link at the bottom-right of the Description field is where you will attach results sent back to you from the speed test template when troubleshooting slow speeds.
3. Requester & Assignee
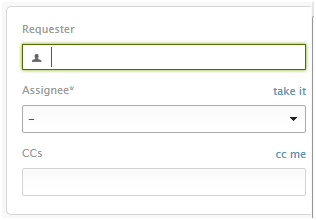
For the Requester field type the email address of the resident and it should auto-populate with the resident’s name.
If the resident’s name does not auto-populate, you need to add them as a user in Zendesk.
For the Assignee field just click the blue link that says “take it” and it will auto-populate as well.
(Leave the CCs field alone for most circumstances)
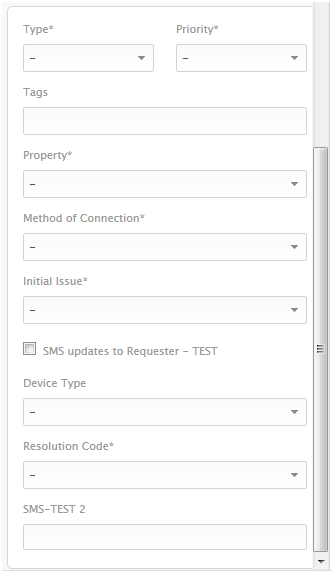
4. Complete the remaining fields.
For the Type drop down there are a few selections:
- Question – Use when the customer just has a question.
- Incident – Issue effecting single user
- Problem – Issue effecting whole sites
For the Priority drop down it is typically safe to set the issue as normal. There may be a few situations where you may want to escalate the priority, but talk to a lead or supervisor for approval.
Property = Property in question
Method of Connection = (set appropriately)
Select your name from the ‘ContactWorks Agent’ drop-down.

5. Set your Resolution code [only use if closing ticket — leave blank if escalating] under the resolution tree:
Support > (issue) > (specifics)

6. Submit Ticket Status:

New – Submit ticket as New if you are escalating to Korcett team for further troubleshooting.
Open – Do not use.
Pending – Submit ticket as Pending if you have identified the customer’s issue is caused by a known site outage. Be sure to reference the outage ticket number in your ticket.
On-hold – Do not use.
Solved – Submit ticket as Solved if you have resolved the customer’s issue on the call.
KMC
KMC allows you to look up and manage a resident’s account and look-up support related details of a supported location.
Go to https://manage.korcett.com
Login
You will be prompted to login at this screen: 
Username: teamkorcett@cwxtx.com
Password: firewall1
Account Search
The Resident tab

It will then take you to the Resident tab where you can search for resident accounts.
The First drop down allows you to select a specific location to filter results by.
The second drop down allows you to select a filter for specific text searches. You can filter the results by the resident’s account ID number, MAC address, email address, first name, last name, or unit number.
Once you do a search for a resident, results matching your search fields will populate. Just click on a the correct resident to open their account screen.
The top part of the account page will have the customer’s account number and information on the left and the customer’s devices on the right.
On the Account Details your can use the move button to change a resident’s location if they move into another location.
You can also update any of the resident’s information. ALWAYS add the customer’s contact phone number if it is not listed or needs to be updated. Remember to hit the save button.
On the Devices frame you or the resident can add their device to the account and allow the device on the internet. Just type the network adapters MAC address and give it a label to identify it by (eg. Macbook, Xbox). Click add device and they should be able to get online.
You can also remove old devices with the delete button.
Some devices such as routers, computers or game consoles may require a Public IP for certain functions. You can just check the Public IP box on the devices MAC address and click Save. They may have to restart their device for the change to occur.
The second half of the screen allows you to reset the resident’s account password (The username is their email address). See how much download and upload speed a resident is supposed to be receiving, and you will also see important notes posted here regarding specific account circumstances such as DMCA notices.
If you pull up a resident’s account and you see an Outages section at the top with a ticket there, you can click the ticket number to open it in Zendesk and check the details of the outage and if it pertains to your caller. 
Add Resident
On the Residents tab you can also help residents by clicking Add Resident at the right hand side. Just fill out all the fields below and create the account if they don’t already have one. When adding a new user in KMC, ALWAYS add the user in Zendesk to properly ticket the interaction. 
Site Support
The Site Support tab 
Here you can select a specific location and get support information pertaining to the property. 
Once you select a location this screen will pop-up.
Wireless SSID will tell you the name of the wifi network if the location has wifi.
Wiring will tell you if the location is single-port or multi-port.
Support lets you know if Korcett supports wired (ethernet) connectivity, wirless or both.
AP Controller IP lets you know the IP scheme the customer should probably receiving directly from the DHCP server.
Tier 1 Support is VERY important. This field tells you if Korcett supports Tier 1 (network troubleshooting) or if the ISP does. If Tier 1 support is the ISP then all we do is verify that there is nothing wrong with the resident’s account and that the appropriate device is on it, then we refer the customer to the ISP (ex: TWC, Suddenlink, Comcast) for network connectivity troubleshooting.