Agents
Quick Reference Guide
CURRENT SCHEDULE
Agent Schedule
CURRENT SCHEDULE
If you are going to be late or not able to work your shift, text your supervisor and send an email to leads@contactworks.us.
- Shared Queue – Shereka Kemp: (281) 796-0179
George Barbour: (512) 920-3159
Michele Serrano: (512) 569-0188 - HR related – Ken Becker: (585) 300-8005
George Barbour: (512) 920-3159
Benefits – 401(k)
Benefits – Health
URL: https://www.aetna.com/about-us/login.html
For first time users, click the Register button, otherwise, you can Login from here.
Finding a Doctor
URL: www.docfind.com
– Under the Guest section, type in your zip code and click on your city that pops up.
– Move the slider to 100 Miles and click on “Search”
– You may have to select your plan in the drop down.
Benefits – Vision/Dental
URL: https://www.ameritas.com/sign-in/
Log in under Personal Accounts > Dental, Vision & Hearing > Member Sign In
If you are accessing your account for the first time, use the Register Now button and follow the steps.
Once logged in, click on the Dental or Vision tab between Home and Contact Us to examine your plan benefits or find a provider.
Company Knowledgebase
URL: helpcwx.com
Username: first letter of your first name and your last name.
“Example: Han Solo would log in as hsolo“
HIPAA Training
This is where you will go to access your company HIPAA training:
User – Logging In
- If you’re not logged in, go to URL: login.complypak.net
- If you’re on the Client Login page, click on USER LOGIN
- Set Username: to your email address
- Set Password: to your assigned password
- Click LOGIN
User Process for Document Reading
- Mouse over Documents and click on Procedure
- Under the Procedures: drop down menu, change Select to the first document in the list.
- Carefully and slowly read the entire document, no matter the length.
- Once done, Put a checkmark in the box next to Selecting this check box indicates you have read and understand all of the content contained in this document.
- Click on FINISH
- Scroll back up the page and under the Procedures: drop down menu, select the next document in the list.
- Continue to carefully and slowly read every available document and checkmark / FINISH each one.
User Process for Training Slides
- Mouse over Training then click on Training
- In the outline on the left, click on Basic Definitions
- Go through every slide for this deck.
- When you have finished the last slide and see the message, You have finished all the training for … scroll down and put a checkmark next to Finish Training
- In the outline on the left, click on the next training module and repeat until all training modules are done.
- Complete everything under
- Baseline Part 1
- Baseline Part 2
- Impermissible uses and Disclosures of PHI
- Workforce Security Member Training
symtrain – training and call simulator platform
Will be used to train / cross-train queues as well as provide call simulation practice.
Logging In
URL: symtrain.io/contactworks/
UN: flast (i.e. kbecker)
Accessing your Training Plan
- Once you’ve logged into symtrain, check your role under your name in the upper right.
. - If it’s not set to trainee, click on the role to change it.
. - Once in the training role, look for and click on My Exercises on the left.
. - Just under the title, click on the View box and change it from All to Training Plan.
. - Click on the DentaQuest – Call Simulator training plan to expand it.
. - You can play your modules from here by clicking on them when ready.
Tasksuite – Phone and Ticket Access
Troomi Team: troomi.tasksuite.com
Celltrion Team: celltrion.tasksuite.com
Shared Queue: cwxtx.tasksuite.com
dial *43 for the echo test to check your own headset
dial *79 to turn off do not disturb mode
dial *98 to access your voicemail by phone
(If your call is not ringing to you, cycle your status to: Online, Busy, Offline, Online, and Online again.)
Username: full work email address
“Example: Han Solo would log in as hsolo@contactworks.us“
- When you are ready to take calls, switch to the web browser tab with your cwxtx.tasksuite.com, and set your status to Online –
 .
.
. - When a call comes in, you’ll be able to click in Tasksuite to answer the call, then change your Tasksuite Status to Busy –
 .
.
Before a call:
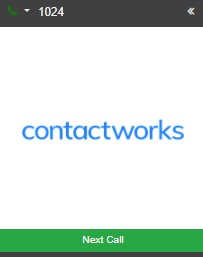
Call Inbound:

During / After a Call
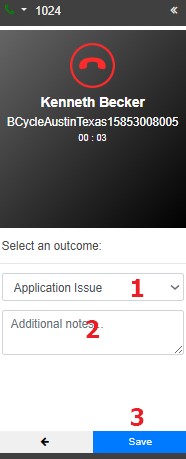
- Select a Disposition
- Paste your Notes
- Hit Save.
During / After a call

In this case, you’ll need to
- 1. click on the plus sign,
- 2. Add the caller’s first name.
- 3. Add the caller’s surname.
- 3. Click the blue Save button
- NOW you can Set your disposition
- Paste in your notes
- Click the blue Save button
Tasksuite – Transferring calls
Follow the steps below to initiate a transfer in tasksuite.

- While on the call, click the Transfer button. .
- On the pop-up, select External Number .
- In this step, you will select or enter the number you wish to transfer to.
- Once Number field populates. Click Blind or Attended Transfer.
- As soon as the Hangup and transfer option appears, click on that to finish the process.
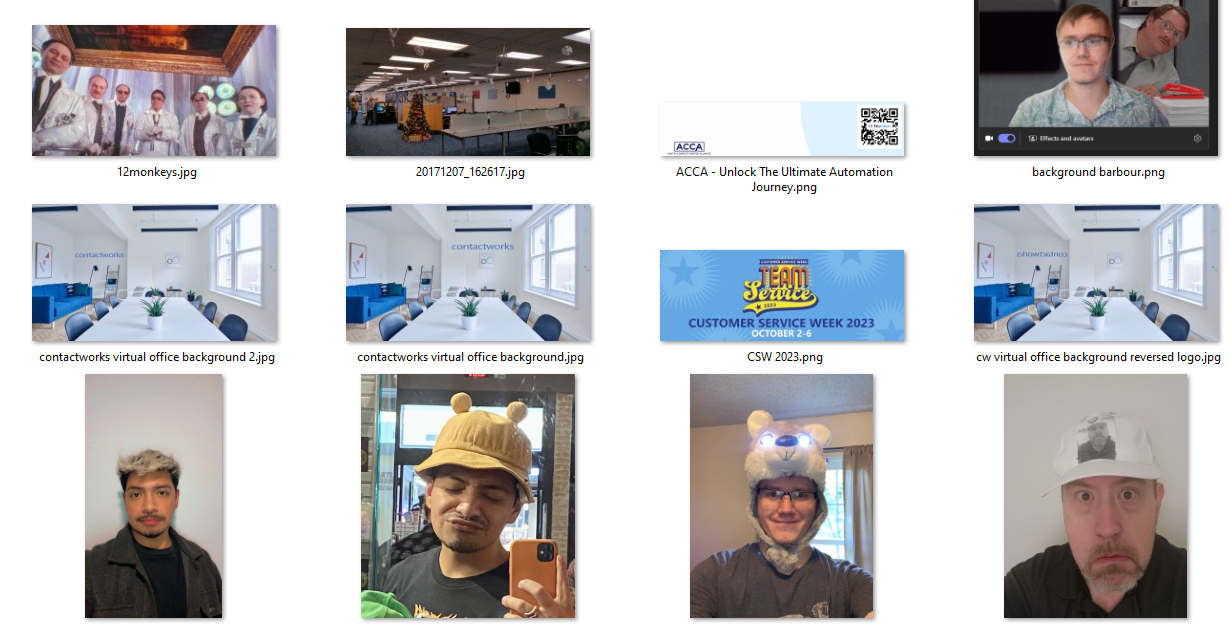
Teams/Zoom – ContactWorks Custom Background
Download the Backgrounds:
– ContactWorks Logo directly behind
– ContactWorks Logo to the side
– Backwards ContactWorks Logo to the side
Note: (Teams, by default, reverses your camera image, so the Backwards logo is for those scenarios)
Set your custom Background:
1. Click on your saved meeting link and make sure you open up the meeting on the Teams Desktop App. (This won’t work on Teams Browser.)
2. In the preview window, make sure your camera is on and click on Background filters.

3. Scroll to the top of the gallery, if you’re not already there, and click Add new.

4. Navigate the file browser to find the downloaded backgrounds, click on that background and on the bottom of your file browser, click on Open to add the picture to the gallery. (Repeat this process for any custom background you want to upload)
5. Once uploaded, find the background in your gallery. Click on it, then at the bottom of the page, click on Apply.

6. Profit!

Teams – Screen Sharing with Sound
This is done in different ways depending on how you are accessing teams. Because Teams is extremely inconsistent with how to share Audio, use the following screens to see which version matches what you’re seeing.
WEB BROWSER TEAMS


1. Click the Share icon
2. Click Screen, window, or tab
3. Select Entire Screen (We’re doing the entire screen in order for audio sharing to work properly)
4. Select the screen you want to share
5. If the option is there to include sound, toggle that on.
6. Now click on the Share button next to the Cancel button.
DESKTOP APP TEAMS
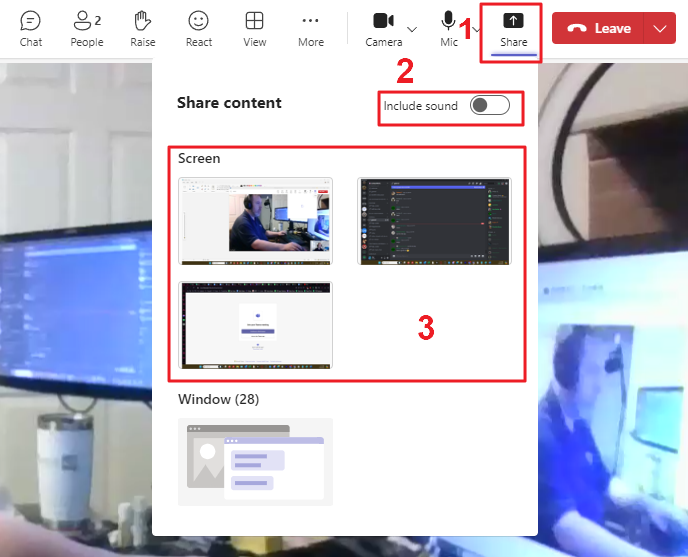
1. Click the Share icon
2. Toggle the Include Sound on
3. Select the monitor you are sharing
DESKTOP APP – TEAMS SCREEN SHARE TOOLBAR

This toolbar is only available if you’re already sharing your screen from the desktop app. If you move your mouse to the top of the screen you are sharing, the toolbar will appear that will allow you to toggle Share sound off and on.
This toolbar is not available when using the browser version of teams.
Timekeeping – ADP Workforcenow
URL: workforcenow.adp.com
Username: work email address without the .us
“Example: Han Solo would log in as hsolo@contactworks“
Clocking in and Out after logging in:
- In the upper menu, left click Myself, then under Time & Attendance, left click My Time Entry.
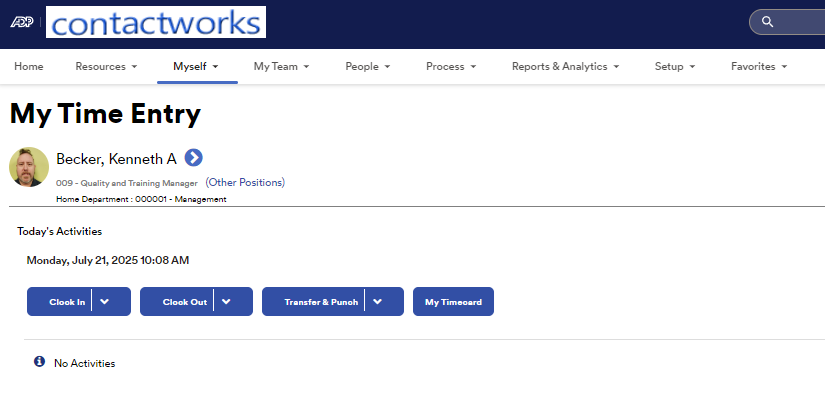
- Click Clock In at the start of your shift, and at the return of your lunch.
- Click Clock Out at the start of your lunch and at the end of your shift.
- Email timecard correction requests to leads@contactworks.us
Transfer Departments – ADP Timekeeping

Use the following steps to transfer your department when switching phone roles.
- Log in at workforcenow.adp.com
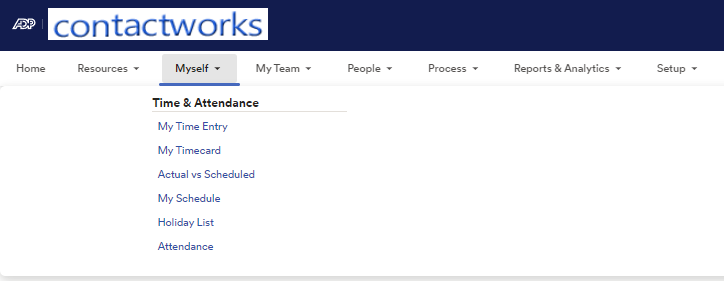
. - Once you log in, look at the upper menu and click Myself
. - Under Time & Attendance click on My Time Entry
.
. - Click on the down arrow next to Transfer & Punch, then click on Transfer & Punch
. .
. - Click inside the Department window top open the drop down. (If you can’t find your target department, click on the More button to see the view list.)
.
. - Once you’re on the department you want to switch to, click Submit.
.
. - Select one of the following departments to switch to
.- 000002 – Shared Queue
- 000017 – Tengo
- 000040 – DQ Secret Shopper
- 000042 – DQ Outbound CA
- 000043 – DQ Directory
- 000044 – Dealerware
- 000045 – Hahn (El Paso Electric)
.
- Once you have selected the department, click on Submit to finish the transfer in timekeeping.
Please let management or a team lead know if you have any questions.
Work Email
URL: email.godaddy.com OR email.contactworks.us
Username: First letter of first name plus last name plus @contactworks.us
“Example: Han Solo would log in as hsolo@contactworks.us“
Once logged in, you will need to click on the Outlook icon on the far left.
Late / Absent / Emergency Contact
Send an email to leads and text your supervisor.
Email: leads@contactworks.us
Supervisor Phone Tree:
- Audi on Demand – Michele Serrano: (512) 569-0188
- Shared Queue – Shereka Kemp: (281) 796-0179
- Manager – George Barbour: (512) 920-3159
- HR related – Ken Becker: (585) 300-8005
2 comments
Leave a Reply
You must be logged in to post a comment.
test
Add Symtrain here